Friday, December 26, 2008
Smaller playlist.com music player for blog
Playlist.com is a popular source for getting free music on your blog. My problem was I didn't want it to be at the bottom of the blog, but on the sidebar. The code they give you makes a music player that is much too wide for a sidebar. Here is how you can edit the code to fit whatever width you want.
Your code should resemble the code below. Simply change the bold numbers from your code to smaller, or larger numbers, depending on the size you want (I only included the beginning of the code, where you need to make changes). For my sidebar I used 285 to replace 450 and then 275 to replace all the 435's.
div style="text-align: center; margin-left: auto; visibility:visible; margin-right: auto; width:450px;"embed style="width: 435px; visibility: visible; height: 270px;" allowscriptaccess="never" src="http://www.greatprofilemusic.com/mc/mp3player-othersite.swf?config=http://www.greatprofilemusic.com/mc/config/config_black.xml&mywidth=435&myheight=270&playlist_url=http://www.greatprofilemusic.com/loadplaylist.php?playlist=55939558" menu="false" quality="high" name="mp3player" width="435" height="270">
Sunday, November 30, 2008
Set Timex 1440 Sports watch
Couldn't find this anywhere on the web (the instruction manual for this watch does not match the watch). After many, many attempts I finally figured it out:
Press and hold the mode button for a few seconds, then, press the mode button again!
The 'set' button then changes the value while the 'start/stop' button will advance to the next thing to set.
At the same time press (and hold?) "start/stop."
You will see the alarm bell icon go away.
Also, see wiki.answers post for more details.
Press and hold the mode button for a few seconds, then, press the mode button again!
The 'set' button then changes the value while the 'start/stop' button will advance to the next thing to set.
Set the Timex 1440 Sports Watch (wr50m) Magnetism watch
hold down the "mode" button for 2 seconds. When the digits on the watch face start to blink, then press the "mode" button again. To change the hours, press the "adjust button". [instructions thanks to a comment below]To turn the alarm off:
Press and hold "set."At the same time press (and hold?) "start/stop."
You will see the alarm bell icon go away.
Also, see wiki.answers post for more details.
Thursday, October 23, 2008
Clean surfing on YouTube
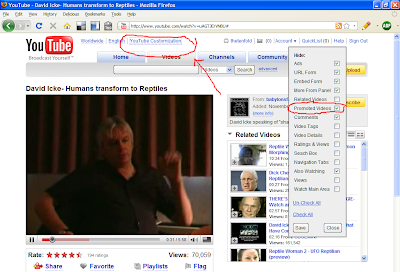
YouTube is a great service. Unfortunately, it seems like dodgy promo videos (at least dodgy thumbnail images) are the norm for the site. Here's how to disable them (I'm assuming you are using Firefox):
- install the addon GreaseMonkey
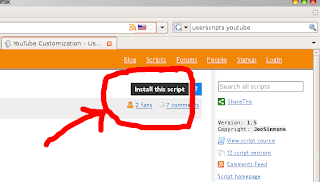
- install the YouTube customization script
- on a video page, customize:
Now, all videos will have blocked Promotional Videos! Hooray! (Note: you can click on the little monkey in the bottom right hand of your browser to disable GreaseMonkey at any time)
Thursday, July 31, 2008
Installing emerald with Ubuntu 8.04
http://hacktivision.com/index.php/2008/06/07/how-to-enhance-ubuntu-8-04-hardy-heron-e?blog=2
Saturday, May 17, 2008
Export plots in R
In R exporting plots is easy:
jpeg("/home/Desktop/nameplot_here.jpg") #name the file and where to export it
hist(data) #this makes a histogram of your data
dev.off() #actually do the exporting
To do png or pdf just substitute it for jpeg.
jpeg("/home/Desktop/nameplot_here.jpg") #name the file and where to export it
hist(data) #this makes a histogram of your data
dev.off() #actually do the exporting
To do png or pdf just substitute it for jpeg.
Thursday, April 10, 2008
Monday, March 24, 2008
Cool applications for Linux
http://linuxondesktop.blogspot.com/2007/07/35-cool-applications-to-install-on.html
Great website, I highly recommend it.
Friday, February 22, 2008
HP scanjet 4370 on Gutsy Gibbon (Ubuntu 7.10)
Here's how I got our scanner working on Gutsy.
Install sane:
Then, you need the driver for your scanner, so go to the sane supported devices page and find your scanner. You access the driver by clicking under the 'Backend' link.
At least in theory, this driver is supposed to be in the sane-backends distribution. I'm not sure where to get it (already come with sane?). Anyway, my device wasn't really recognized when firing up 'xsane' until I downloaded and installed the driver.
Now, we have to set the permissions such that we can access our scanner. Notice that we use the the usb port information gleaned about to accomplish this:
Install sane:
sudo aptitude install sane sane-utilsThen find out where your scanner resides:
sane-find-scannerYou're interested in the series of usb ports that your usb is connected to:
found USB scanner (vendor=0x03f0 [hewlett packard],In my case, the scanner is plugged into usb port 007 and subport 006 (I have no idea if that's the proper way to talk about it, but you'll see that it will work to think like that)
product=0x4105 [hp scanjet], chip=rts8822L-01H?) at libusb:007:006
Then, you need the driver for your scanner, so go to the sane supported devices page and find your scanner. You access the driver by clicking under the 'Backend' link.
At least in theory, this driver is supposed to be in the sane-backends distribution. I'm not sure where to get it (already come with sane?). Anyway, my device wasn't really recognized when firing up 'xsane' until I downloaded and installed the driver.
Now, we have to set the permissions such that we can access our scanner. Notice that we use the the usb port information gleaned about to accomplish this:
sudo chmod a+rw /proc/bus/usb/007/006A person is supposed to be able to automate that process, but I haven't figured it out yet. In any case, we can now fire up sane with the command 'xsane' or install 'gimp2.0-quiteinsane' to access from within gimp.
Saturday, February 16, 2008
Using LCD Projectors or monitors with Ubuntu Gutsy Gibbon and Nvidia
Under Edgy and Feisty, you could just restart your machine, hit your [CRT/LCD] (Fn+F8 on my machine) while it was loading and it would automatically do this for you.
Under Gutsy, this will work (may be easier/better ways to do this):
- run command 'nvidia-settings' and go to 'X Server Display Configuration'
- If you are all plugged in, there should be two grey boxes displayed, one labeled 'LGP' (your LCD screen) and another (mine's labeled 'LG').
- Change the resolution of your current display to match what you will be using (most projectors are 1024x768)
- Now, click on the LG box. (The way to control which display you are dealing with are clicking and moving those boxes)
- You should see a box with a Configuration: Disabled and button [Configure]; click the Configure button.
- How Should this display device be configured? Click 'TwinView'
- Resolution 'Auto'
- Position 'Clones'
- Then hit 'Apply'
That's it!
If you want to run this configuration with no setup, then click on the 'Save to X Configuration File' and copy it over your /etc/X11/xorg.conf file whenever you need it (make sure you backup your original xorg.conf file!)
To undo it, click on the Configure button for LG, and click 'Disabled'. Then, change the resolution for your current screen and hit the 'Apply' button.
NOTE: this does not want to work under wmii-ruby because it does not want to respond to the change in resolution from gnome-display-properties.
Friday, February 15, 2008
Gutsy Gibbon broken matplotlib, pylab
Usually, Ubuntu's package management system gets everything right. However, on Gutsy Gibbon when you install the very handy matplotlib it gives you a broken installation. Basically, you'll get some error messages like this:
So, I think they are trying to allow you to use whatever linear algebra backend you want. A fix (maybe there are better ones) is to install lapack3:
>>> import pylab
Traceback (most recent call last):
File "", line 1, in ?
File "/usr/lib/python2.4/site-packages/pylab.py", line 1, in ?
from matplotlib.pylab import *
File "/usr/lib/python2.4/site-packages/matplotlib/pylab.py", line 199, in ?
import cm
File "/usr/lib/python2.4/site-packages/matplotlib/cm.py", line 5, in ?
import colors
File "/usr/lib/python2.4/site-packages/matplotlib/colors.py", line 38, in ?
from numerix import array, arange, take, put, Float, Int, putmask, \
File "/usr/lib/python2.4/site-packages/matplotlib/numerix/__init__.py", line 82, in ?
import numpy
File "/usr/lib/python2.4/site-packages/numpy/__init__.py", line 43, in ?
import linalg
File "/usr/lib/python2.4/site-packages/numpy/linalg/__init__.py", line 4, in ?
from linalg import *
File "/usr/lib/python2.4/site-packages/numpy/linalg/linalg.py", line 25, in ?
from numpy.linalg import lapack_lite
ImportError: /usr/lib/atlas/liblapack.so.3: undefined symbol: ATL_chemv
So, I think they are trying to allow you to use whatever linear algebra backend you want. A fix (maybe there are better ones) is to install lapack3:
sudo aptitude install lapack3
Thursday, February 14, 2008
CSS for ruby syntax highlighting
Add this to your css to get ruby code colored nicely.
from http://redcorundum.blogspot.com/2006/07/syntax-coloring.html
pre.code {
padding: 1ex 1ex 1ex 1ex;
border: 4px groove #CC0000;
overflow-x: auto;
}
pre.code span.attribute { color: #009900; }
pre.code span.char { color: #F00; }
pre.code span.class { color: #A020F0; font-weight: bold; }
pre.code span.comment { color: #0000FF; }
pre.code span.constant { color: #008B8B; }
pre.code span.escape { color: #6A5ACD; }
pre.code span.expr { color: #2222CC; }
pre.code span.global { color: #11AA44; }
pre.code span.ident { color: #000000; }
pre.code span.keyword { color: #A52A2A; font-weight: bold; }
pre.code span.method { color: #008B8B; }
pre.code span.module { color: #A020F0; font-weight: bold; }
pre.code span.number { color: #DD00DD; }
pre.code span.punct { color: #6A5ACD; }
pre.code span.regex { color: #DD00DD; }
pre.code span.string { color: #DD00DD; }
pre.code span.symbol { color: #008B8B; }
Thursday, January 31, 2008
Install Ubuntu as a file in windows with one-click
If you want to try out linux (Ubuntu), this is BY FAR the easiest method. Just download this installer. The next time you reboot you can choose Windows or Linux:
http://wubi-installer.org/index.php
Basically, a file (6GB by default) is allocated inside of windows and a boot loader is installed. On reboot, you can choose windows or linux. When you are done, you can uninstall it and it goes away. Or, there are ways to migrate that file into a fresh partition if you want.
Very smooth.
Monday, January 28, 2008
R help in a browser
Really annoying to try to look up docs in a window you are using. Instead, try this:
help.start() # this will start up documentation in a browser
help(plot) # shows documentation in browswer window now!
data.frame in R (the key object)
I've been wading through R trying to figure out how it all works. It looks like the most important data structure is the data frame, and here I demo how to make a dataframe that a person can then play with. Yes, you can import data from a spreadsheet, but a person should understand the underlying data structure.
A data.frame is just a list of vectors or matrices where each has the same number of rows (think of the vectors as columns). It really is just the same as data in a spreadsheet:
In fact, when one reads in this type of info, one gets a data.frame back:
So, assuming we have some data like the above, now lets make it in R:
A data.frame is just a list of vectors or matrices where each has the same number of rows (think of the vectors as columns). It really is just the same as data in a spreadsheet:
var1 | var2 | var3 | fac1 | fac2 |
---|---|---|---|---|
1 | 3 | 4 | hot | TX |
0 | 2 | 3 | cold | WI |
3 | 8 | 2 | cold | UT |
In fact, when one reads in this type of info, one gets a data.frame back:
df = read.csv(".csv", quote="") # <-reads an unquoted csv file with headers
So, assuming we have some data like the above, now lets make it in R:
> var1 <- c(1,0,3) # '<-' is the assignment operator (like a directional '=')
# 'c()' is the concatenate operator (makes lists of things)
> var2 <- c(3,2,8)
> var3 <- array( c(4,3,2), c(3) ) # here's how you make a more mathematical vector
> fac1 <- c("hot", "cold", "cold")
> fac2 <- c("TX","WI","UT")
# alright, lets add all this stuff together into a dataframe:
> df <- data.frame(var1,var2,var3,fac1,fac2, row.names=NULL, check.rows=TRUE)
# creates this:
var1 var2 var3 fac1 fac2
1 1 3 4 hot TX
2 0 2 3 cold WI
3 3 8 2 cold UT
# want to see the names of the columns in the dataset:
> names(df)
[1] "var1" "var2" "var3" "fac1" "fac2"
# change the names:
> names(df) <- c("height", "weight", "nose.length", "temp", "state")
> df
height weight nose.length temp state
1 1 3 4 hot TX
2 0 2 3 cold WI
3 3 8 2 cold UT
# so, now we have a data.frame, the preferred data structure in R. Let the magic begin:
> plot(df)
Friday, January 25, 2008
Installing and basic plotting in R
Windows users:
http://cran.r-project.org/bin/windows/base/
Download R-2.6.1-win32.exe and install it like any program.
Start it like any other program from the start menu
Linux users:
sudo apt-get install r-base
Just type R in the terminal
Read in a file
Go into excel or even a text editor and create a simple data set like this:
1,3
2,5
2,6
3,8
4,4
6,3
7,9
Where the second column is after the comma.
Save your file as a .csv
Look up where you saved it and insert that as the location in the following code:
data<-read.table("/home/eldon/Desktop/data.csv",sep=",") #this reads in your data and assigns it to the data frame "data"
plot(data) #this gives you a simple plot of your data
If you want to learn more about simple plotting just enter:
help(plot)
Thursday, January 24, 2008
Scientists for Better PCR
http://bio-rad.cnpg.com/lsca/videos/ScientistsForBetterPCR/
Good for a laugh
Good for a laugh
Wednesday, January 23, 2008
R from ruby
rsruby lets you run supposedly any function in R from ruby.
Elaborating on the sci-ruby page
I thought this was necessary, but don't so much any more:
Elaborating on the sci-ruby page
sudo apt-get install r-base ruby1.9.1-full ruby1.9.1-dev
sudo ln -s /usr/lib/R/lib/libR.so /usr/lib/libR.so
sudo ln -s /usr/share/R/include/R.h /usr/include/R.h
gem install rsruby -- --with-R-dir=/usr/share/R
I thought this was necessary, but don't so much any more:
# add a line to your .bashrc file to point to R:
echo "export R_HOME=/usr/lib/R" >> ~/.bashrc
source ~/.bashrc # read the bashrc file to get the variable
sudo make me a sandwich
http://imgs.xkcd.com/comics/sandwich.png
If you don't know what this is about, stick around and you might. eventually. after an explanation.
Subscribe to:
Posts (Atom)