Download and install GIMP.
windows download or ubuntu (sudo apt-get install gimp).
In GIMP,
Filters -> Artistic -> Photocopy
A dialog box will allow you to adjust the sharpness and amount of black and white you want to see with a preview.
That's it!
Sunday, September 20, 2009

Monday, August 3, 2009
starting with timidity and soundfonts on Ubuntu Linux
On the command line:
I like to have a folder with my timidity configuration files and soundfonts in my home directory:
Inside that folder I'll have my "master" configuration called "timidity.cfg" and a layout something like this (I'm actually omitting a lot here):
Now, we can edit the "global" configuration file to point to our timidity configuration file:
That file basically turns on freepats and then points to your home configuration. Timidity lets you "cascade" sounds, so activating freepats will ensure that you have some kind of sound for most of the banks accessed by your midi files. Any patches/soundfonts you later specify will override those previously specified.
Here's my timidity.cfg file:
The dir command just "activates" a given directory so that I can then call the configuration files in it by their basename as shown. With this configuration, I can set up lots of preconfigured sounds that I can easily turn on and off in my "master" configuration file.
OK, so now, lets get a soundfont and use it to play some music:
The Blanchet is my favorite harpsichord soundfont at the moment (Download the sf2 file Download the sf2 file). Turns out most sf2 files are compressed with sfark, so you need to download software to decompress it. After you decompress the soundfont, you'll want to look at the soundfont. Linux has a soundfont editor called "swami" that lets you see what's in a soundfont:
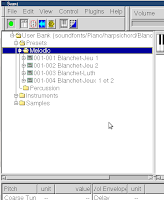
We are interested in the little numbers in the Melodic section: (001-001 ... 001-004). The code is this: <bank>-<instrument>. That means that for this soundfont the 4 "sounds" are in bank 1 and are deposited as instrument 1-4. OK, so now we know the layout of the sound font. Now, when we play a midi file, we can map these to the appropriate instruments to get the sounds we want. So, how do we do that? We do it in timidity configuration files. My "harpsichord.cfg" file that is referenced by my timidity.cfg file looks like this:
Again, the "dir" command "activates" the directory that contains my Blanchet-400_ver.1.0.sf2 soundfont file so I can access it in my file by its base filename. The bank 0 is now specifying which instrument sounds we are going to provide for midi files that access bank 0 (which is most of them since bank 0 is the main bank).
<midi_instrument> %font <soundfont.sf2> <soundfont_bank> <soundfont_instrument>
midi_instrument: the program change found in the midi file. The General Midi (GM) typical mapping (note: timidity starts numbering at '0', so you need to subtract '1' from each of these to specify them in timidity).
%font: means this is a soundfont (patches don't require it), then .
soundfont_bank: the bank the instrument is found in your soundfont
soundfont_instrument: the instrument as found in your soundfont
So, here I've mapped the first harpsichord manual (bank 1, instrument 1) to instrument 6 ("harpsichord" in GM), the second harpsichord manual (bank 1, instrument 2) to instrument 7 ("clavinet"), the lute harpsichord sound (bank 1, instrument 3) to instrument 9 ("Celesta") and the sound with both harpsichords (bank 1, instrument 4) to instrument 10 ("Glockenspiel"). Now, a midi file that has a "program change" (instrument) specifying a harpsichord will access my first harpsichord manual and so on.
If a midi file is just one instrument, just match up the soundfont sound with the instrument specified in the midi file. If you have different midi tracks, you can go in and change the midi track to match up with those in your timidity file. This can be done in rosegarden (sudo aptitude install rosegarden) or many other midi editors (I write my own ruby programs based on midilib to modify instruments, volumes, pan, in my midi files but these (pan and volume) can also be specified in your timidity file (as long as each midi track accesses a different instrument). For example:
Now we can fire up timidity on our midi file (here are some good ones). These each have different numbers of tracks, but each track is for "harpsichord" (which we've pointed to the first soundfont of the Blanchet file in harpsichord.cfg file):
Let me know if you have any questions/troubles and I'll try to update this post to answer them.
sudo aptitude install timidityI like to have a folder with my timidity configuration files and soundfonts in my home directory:
/home/<user>/timidity
Inside that folder I'll have my "master" configuration called "timidity.cfg" and a layout something like this (I'm actually omitting a lot here):
timidity
|-- Piano.cfg
|-- ensemble.cfg
|-- harpsichord.cfg
|-- organ.cfg
|-- patches
|   |-- eawpats12_full
|   |   |-- acbass.pat
|   |   |-- [...]
|-- soundfonts
|   |-- Ensemble
|   |   |-- Zemljak_Overture.sf2
|   |   |-- choir
|   |   |   |-- 052_Florestan_Ahh_Choir.sf2
|   |   |   |-- Boychoir.sf2
|   |   |   `-- boychoir.txt
|   |-- Organ
|   |   |-- GothicOrgan.sf2
|   |   |-- jeux14.sf2
|   |   `-- jeux2.sf2
|   |-- Piano
|   |   |-- ClavinovaGrandPiano2.sf2
|   |   |-- RolandPowerGrand.sf2
|   |   |-- harpsichord
|   |   |   |-- Blanchet-440_ver.1.0.sf2
|   |   |   |-- Campbells_Harpischord_tuned_1.sf2
|   |   |   `-- Petit_Italien.sf2
Now, we can edit the "global" configuration file to point to our timidity configuration file:
sudo gedit /etc/timidity/timidity.cfg
---
# Instrument configuration file for timidity
# $Id: timidity.cfg,v 1.7 2005/09/03 19:26:03 hmh Exp $

# [... omitting some for brevity ...]
# [ NOTE: With a recent CPU you can leave everything commented in this file no problem ]

# Include a configuration for the selected patchset or soundfont
# By default, try to use the instrument patches from freepats:

source /etc/timidity/freepats.cfg

## added by JTP ##
source /home/john/timidity/timidity.cfg
That file basically turns on freepats and then points to your home configuration. Timidity lets you "cascade" sounds, so activating freepats will ensure that you have some kind of sound for most of the banks accessed by your midi files. Any patches/soundfonts you later specify will override those previously specified.
Here's my timidity.cfg file:
dir /home/john/timidity
# (NOTE: I just comment out the config files I'm not using)
#source jeux14.cfg
#source organ.cfg
#source merlin.cfg
#source Piano.cfg

source harpsichord.cfg
The dir command just "activates" a given directory so that I can then call the configuration files in it by their basename as shown. With this configuration, I can set up lots of preconfigured sounds that I can easily turn on and off in my "master" configuration file.
OK, so now, lets get a soundfont and use it to play some music:
The Blanchet is my favorite harpsichord soundfont at the moment (Download the sf2 file Download the sf2 file). Turns out most sf2 files are compressed with sfark, so you need to download software to decompress it. After you decompress the soundfont, you'll want to look at the soundfont. Linux has a soundfont editor called "swami" that lets you see what's in a soundfont:
# only in Ubuntu 9.04 or earlier !!
sudo aptitude install swami
# you can fire it up with the soundfont on the command line if you want (or without)
swami timidity/soundfonts/Piano/harpsichord/Blanchet-440_ver.1.0.sf2

We are interested in the little numbers in the Melodic section: (001-001 ... 001-004). The code is this: <bank>-<instrument>. That means that for this soundfont the 4 "sounds" are in bank 1 and are deposited as instrument 1-4. OK, so now we know the layout of the sound font. Now, when we play a midi file, we can map these to the appropriate instruments to get the sounds we want. So, how do we do that? We do it in timidity configuration files. My "harpsichord.cfg" file that is referenced by my timidity.cfg file looks like this:
dir /home/john/timidity/soundfonts/Piano/harpsichord

bank 0

6 %font Blanchet-440_ver.1.0.sf2 1 1
7 %font Blanchet-440_ver.1.0.sf2 1 2
8 %font Blanchet-440_ver.1.0.sf2 1 3
9 %font Blanchet-440_ver.1.0.sf2 1 4
Again, the "dir" command "activates" the directory that contains my Blanchet-400_ver.1.0.sf2 soundfont file so I can access it in my file by its base filename. The bank 0 is now specifying which instrument sounds we are going to provide for midi files that access bank 0 (which is most of them since bank 0 is the main bank).
<midi_instrument> %font <soundfont.sf2> <soundfont_bank> <soundfont_instrument>
midi_instrument: the program change found in the midi file. The General Midi (GM) typical mapping (note: timidity starts numbering at '0', so you need to subtract '1' from each of these to specify them in timidity).
%font: means this is a soundfont (patches don't require it), then
soundfont_bank: the bank the instrument is found in your soundfont
soundfont_instrument: the instrument as found in your soundfont
So, here I've mapped the first harpsichord manual (bank 1, instrument 1) to instrument 6 ("harpsichord" in GM), the second harpsichord manual (bank 1, instrument 2) to instrument 7 ("clavinet"), the lute harpsichord sound (bank 1, instrument 3) to instrument 9 ("Celesta") and the sound with both harpsichords (bank 1, instrument 4) to instrument 10 ("Glockenspiel"). Now, a midi file that has a "program change" (instrument) specifying a harpsichord will access my first harpsichord manual and so on.
If a midi file is just one instrument, just match up the soundfont sound with the instrument specified in the midi file. If you have different midi tracks, you can go in and change the midi track to match up with those in your timidity file. This can be done in rosegarden (sudo aptitude install rosegarden) or many other midi editors (I write my own ruby programs based on midilib to modify instruments, volumes, pan, in my midi files but these (pan and volume) can also be specified in your timidity file (as long as each midi track accesses a different instrument). For example:
19 %font FluidR3GM.SF2 0 19 amp=140 pan=0
Now we can fire up timidity on our midi file (here are some good ones). These each have different numbers of tracks, but each track is for "harpsichord" (which we've pointed to the first soundfont of the Blanchet file in harpsichord.cfg file):
timidity <your_midi>.mid
# or what I often will use:
timidity --verbose  <your_midi>.mid -EFreverb=3,40 -A150
# once you have it sounding like you want, you can record to a .wav file:
timidity <your_midi>.mid -Ow
# then you can convert to an mp3 with lame (install with: 'sudo aptitude install lame')
lame --preset medium <your_midi>.wav <your_midi>.mp3
Let me know if you have any questions/troubles and I'll try to update this post to answer them.
Friday, July 17, 2009
How to version control your projects with bazaar
So you have a project named 'supercool' that happens to sit in a directory named (what else) 'supercool'. Assuming you have bazaar installed on your client computer and the server, this is how you start a project under a centralized "lock-step" model. IMHO, this model works best for solo projects if you have a server available to you:
So, now you can work on files in your project and have them versioned. Your daily work-flow will look like this:
That's it! The bazaar documentation is great, particularly the user guide.
cd supercool # make sure you are at the top level directory of your project
bzr init  # starts up version control in this directory (an independent branch right now)
bzr add   # will recursively add files in your project
bzr ci -m 'initial commit'  # makes a commit to your branch
# the next step assumes you have already made the directory /home//bzr on your server
# this step will create a centralized repository on your remote
bzr push sftp://<user>@myserver.domain.org/home/<user>/bzr/supercool
# now, we need to 'bind' our independent branch to the remote branch
# which transforms it into "centralized mode"
bzr bind sftp://<user>@myserver.domain.org/home/<user>/bzr/supercool

# to check out a fresh copy on a different computer
bzr co sftp://<user>@myserver.domain.org/home/<user>/bzr/supercool
So, now you can work on files in your project and have them versioned. Your daily work-flow will look like this:
# assuming you are in your project directory...
bzr up  # update your repo with any changes in the centralized repo
## do some work...
bzr add <file1> <file2>  # add any new files, etc.
bzr ci -m 'adding new files, changed some other ones'
That's it! The bazaar documentation is great, particularly the user guide.
Friday, June 26, 2009
Adding Music to a Blogger Blog using Playlist.com
There are basically two ways you can add a playlist.com music player to your blog on blogger blogs. The first that I tried was to use one of blogger's prepared gadgets. I found that these did not look very good. Instead, there is a better way.
1) Visit playlist.com and go to "Post My Playlist." Choose "Get the code for any other social network, blog or your own personal website >>". It is currently the last choice, choice "E". Follow their directions to get the code. Select and copy it.
2) Go to your blog and sign in. Go to "Customize", "Layout", "Page Elements", "Add a Gadget", "HTML/Javascript". Paste the code into the main field and you're set.
3) Sizing the player: View the blog and see how it looks. If you don't like the dimensions, you can change the element dimensions by going back and editing the html of the element. The height and width show up in several places in the code, so you'll want to change them all. For my blog, I currently have it set to 300px wide and 208px tall. I have copied the code from my blog, removing the "<" and ">" characters so that it wouldn't actually insert the player into this post. You can see that the easiest approach is really to do a ctrl+f to find all the numbers. Just be careful that they are really dimensions and not part of another number or for something else (for an example of a number you shouldn't change, see the blue 208).
div style="text-align: left; margin-left: auto; visibility:visible; margin-right: auto; width:300px;" object width="300" height="208" param value="http://www.profileplaylist.net/mc/mp3player_new.swf" name="movie"/ param value="never" name="allowscriptaccess"/ param value="transparent" name="wmode"/ param value="config=http%3A%2F%2Fwww.indimusic.us%2Fext%2Fpc%2Fconfig_black_shuffle.xml&mywidth=290&myheight=208&playlist_url=http%3A%2F%2Fwww.indimusic.us%2Floadplaylist.php%3Fplaylist%3D42390100%26t%3D1245208454&wid=os" name="flashvars"/ embed border="0" allowscriptaccess="never" flashvars="config=http%3A%2F%2Fwww.indimusic.us%2Fext%2Fpc%2Fconfig_black_shuffle.xml&mywidth=300&myheight=208&playlist_url=http://www.indimusic.us/loadplaylist.php?playlist=42390100&t=1245208454&wid=os" type="application/x-shockwave-flash" height="208" src="http://www.profileplaylist.net/mc/mp3player_new.swf" style="width:300px; visibility:visible; height:208px;" width="300" wmode="transparent" name="mp3player"/ /embed/object br/ a /a /div
To know what will look best in your blog, you might take some time to read through the html for your blog to find your sidebar width. If it is a percentage then you may just have to guess at the width until you get it how you want it. If it is set to a number of pixels (like 250px) then you can just change the width to 250px. That should usually give a good fit. If not, try a different width.
1) Visit playlist.com and go to "Post My Playlist." Choose "Get the code for any other social network, blog or your own personal website >>". It is currently the last choice, choice "E". Follow their directions to get the code. Select and copy it.
2) Go to your blog and sign in. Go to "Customize", "Layout", "Page Elements", "Add a Gadget", "HTML/Javascript". Paste the code into the main field and you're set.
3) Sizing the player: View the blog and see how it looks. If you don't like the dimensions, you can change the element dimensions by going back and editing the html of the element. The height and width show up in several places in the code, so you'll want to change them all. For my blog, I currently have it set to 300px wide and 208px tall. I have copied the code from my blog, removing the "<" and ">" characters so that it wouldn't actually insert the player into this post. You can see that the easiest approach is really to do a ctrl+f to find all the numbers. Just be careful that they are really dimensions and not part of another number or for something else (for an example of a number you shouldn't change, see the blue 208).
div style="text-align: left; margin-left: auto; visibility:visible; margin-right: auto; width:300px;" object width="300" height="208" param value="http://www.profileplaylist.net/mc/mp3player_new.swf" name="movie"/ param value="never" name="allowscriptaccess"/ param value="transparent" name="wmode"/ param value="config=http%3A%2F%2Fwww.indimusic.us%2Fext%2Fpc%2Fconfig_black_shuffle.xml&mywidth=290&myheight=208&playlist_url=http%3A%2F%2Fwww.indimusic.us%2Floadplaylist.php%3Fplaylist%3D42390100%26t%3D1245208454&wid=os" name="flashvars"/ embed border="0" allowscriptaccess="never" flashvars="config=http%3A%2F%2Fwww.indimusic.us%2Fext%2Fpc%2Fconfig_black_shuffle.xml&mywidth=300&myheight=208&playlist_url=http://www.indimusic.us/loadplaylist.php?playlist=42390100&t=1245208454&wid=os" type="application/x-shockwave-flash" height="208" src="http://www.profileplaylist.net/mc/mp3player_new.swf" style="width:300px; visibility:visible; height:208px;" width="300" wmode="transparent" name="mp3player"/ /embed/object br/ a /a /div
To know what will look best in your blog, you might take some time to read through the html for your blog to find your sidebar width. If it is a percentage then you may just have to guess at the width until you get it how you want it. If it is set to a number of pixels (like 250px) then you can just change the width to 250px. That should usually give a good fit. If not, try a different width.
Wednesday, June 24, 2009
Weather-util alias for linux
With administrator rights open weatherrc (should be in etc/)
The file should have a bunch of entries that look similar to this. I am showing how I created an alias for DFW.
[DFW] #Alias name
City = Dallas Ft Worth #http://tinyurl.com/28pxfg (Find your city)
ID = KDFW #ID code, see note below on how to find it
St = TX #Enter your state's abbreviation
It is easiest to find your ID code by going to http://weather.noaa.gov/ and finding your Current Weather Conditions location. When you have found it look for the four letter identification, that is your ID.
Create your own aliases by adding to the weatherrc file.
Save the file and go to the terminal and type: weather DFW
If you want more information, tell it to be verbose: weather DFW -v
If you want the forecast: weather DFW -f
The file should have a bunch of entries that look similar to this. I am showing how I created an alias for DFW.
[DFW] #Alias name
City = Dallas Ft Worth #http://tinyurl.com/28pxfg (Find your city)
ID = KDFW #ID code, see note below on how to find it
St = TX #Enter your state's abbreviation
It is easiest to find your ID code by going to http://weather.noaa.gov/ and finding your Current Weather Conditions location. When you have found it look for the four letter identification, that is your ID.
Create your own aliases by adding to the weatherrc file.
Save the file and go to the terminal and type: weather DFW
If you want more information, tell it to be verbose: weather DFW -v
If you want the forecast: weather DFW -f
Thursday, May 21, 2009
Multiple ANOVA tests in R by a grouping factor
If you have ever needed to run multiple ANOVA's according to or by a certain grouping factor here is your guide:
To do Type III sums of squares you'll need the car package. To split up your data by a grouping factor you'll need the doBy package.
Begin with a dataframe that has your factors, response, and grouping factor as columns (Y = response, A = factor A, B = factor B, Group = grouping factor)
If you have never read in data before into R, try something like this:
I prefer to simply use text files that are delimited by space or tab.
Next name your columns:
Now you need to split your data up according to your grouping factor.
Lastly, run this loop:
R output can be accessed in row and column fashion [r,c]. I have this particular code give me only the p-value from the interaction of factors A and B. By changing [4,4] to other numbers you can access whatever part of the ANOVA table you want. Hope this helps.
To do Type III sums of squares you'll need the car package. To split up your data by a grouping factor you'll need the doBy package.
install.packages("car")
install.packages("doBy")
library(car)
library(doBy)
Begin with a dataframe that has your factors, response, and grouping factor as columns (Y = response, A = factor A, B = factor B, Group = grouping factor)
If you have never read in data before into R, try something like this:
data<- read.table("/home/user/Desktop/data.txt")I prefer to simply use text files that are delimited by space or tab.
Next name your columns:
names(data)<-c("Y","A","B","Group")Now you need to split your data up according to your grouping factor.
data_split<-splitBy(~Group,data=data)
Lastly, run this loop:
i <-1 while(i <=length(data_split)){
 print (Anova(lm(Y~A+B+A*B, data_split[[i]]),type="III")[4,4])
 i<- i +1
}
R output can be accessed in row and column fashion [r,c]. I have this particular code give me only the p-value from the interaction of factors A and B. By changing [4,4] to other numbers you can access whatever part of the ANOVA table you want. Hope this helps.
Friday, May 8, 2009
two-column default for wmii-ruby (sort of like xmonad)

How to default to 2 columns in wmii-ruby?
Add this to your wmiirc-config.rb file:
on_createclient do |cid|
  tag = read("/client/#{cid}/tags")
  # does the last line start with a "1", then only one column
  if read("/tag/#{tag}/index").split("\n").last.match(/^1\s+/)
    write("/tag/sel/ctl", "send sel right")
  end
end
Basically, if you have one column of applications and you open another client, this will shove your client to the right, making a 2nd column. This should work on the wmii 3.5-3.6 series.
This (not going automatically into 2 columns) has bothered me a lot in the past and when I was trying out xmonad I found that they do this in the default layout. [It would be fun to implement the rest of the basic xmonad layouts in wmii-ruby...]
What is wmii-ruby? (in case you're asking)
I've been playing around again with wmii-ruby. wmii is a minimalist window manager for X11 (i.e., graphics on *nix-ish OS's) that is very scriptable and wmii-ruby is (you guessed it) wmii scripted in ruby. Best features:
- tiling window manager (use all your screen space)
- uses very flexible tagging system to keep things organized.
- very scriptable (see above example)
- can use a mouse but don't really need to
Thursday, April 30, 2009
Battle for Wesnoth: Kid-Friendly
 |
| artwork from Battle for Wesnoth, modified by JTP |
Introduction
Skip introThe Battle for Wesnoth--consistently ranked at the top of open-source games--is a really extraordinary strategy game that also happens to be free. On the surface it doesn't seem that special: it doesn't feature any stunning graphics and it is turn-based, so it is much more contemplative than action-packed. Why is it so great? Well, you really need to play it a while to understand, but the main things are:
- Very interesting strategy component - sort of feels like playing a higher-level Risk game or a slower turn-based Rise of Nations. To win you have to deal effectively with day/night, terrain, attack/defense, recruitment, character development, health etc. There are enough components to keep things interesting but not so many to be overwhelming.
- Engaging storylines - compelling single (and even some multi-user) campaigns.
- Character development - Characters can be developed somewhat (i.e, raise levels) which provides some familiarity (and hence attachment) to them but this is limited to only a few levels which prevents this aspect from overshadowing the game's strategy component.
- Good AI - the computer doesn't really make dumb moves, you either have to outsmart or overpower the enemy to win.
- Visually beautiful - I mentioned that the graphics are 2D, but even though they are simple, they are quite engaging. Much of the artwork is really great.
- Good music - in a classical-esque tradition.
- Free.
- Extendable - it isn't very difficult to create your own game or campaign.
Kid-friendly graphics
I have a lot of young boys who happen to really like this game. For a game set in a fantasy world completely realized with community contributed artwork, Wesnoth is remarkably kid-friendly. While there is nothing approaching pornography in it, there are a handful of portraits and units that are not attired as modestly as could be hoped. Most of the ones I've tidied up really didn't need it much, but since I was at it...
The beauty of open-source is that the software (in this case the images) can be modified to suit one's own tastes. I took liberty to touch up a few pictures, trimmed some others and wrote a script that will replace them in one click. The replacement artwork is rough around the edges, but it gets the job done (see my conglomerate image above).
How to run wesnoth-kid-friendly
This assumes you are on Windows (instructions are included in the zip file for other OS's):
- Install Battle for Wesnoth - ideally in the default location so my script can find it.
- Install the one-click ruby installer. (go the section "Ruby on Windows" and click on the "Ruby One-Click Installer link")
- Download my zip file. (this contains kid-friendly up artwork and a script to copy them into place).
- Unzip it.
- Click on wesnoth-kid-friendly.rb (NOTE: this writes over the old images. Of course, you can always reinstall it if you don't like what I've done)
Tuesday, April 28, 2009
Keyboard Shortcuts in Gnome, KDE, wmii, or whatever
Ubuntu Jaunty Jackelope put keyboard shortcuts in their proper place (disabling those in metacity and putting them in 'Keyboard Shortcuts'). However, when opening a gnome terminal from this shortcut, you have to explicitly tell it to start in your home directory or it will start in '/'
I like to set up my keyboard shortcuts with a script since I like to use them on whatever computer I'm on. I did this before with gconftool2 and that worked fine, but now a person has to set them in a different location in a different way... which got me thinking that it would be nice to set keyboard shortcuts in a cross-desktop (KDE, Gnome, wmii, whatever) kind of way.
Solution: xbindkeys
Make a file called '.xbindkeysrc' in your home directory with something like this in it:
now you can turn on the shortcuts with the simple command 'xbindkeys', but we'd really like for them to be turned on once when we login. Turns out cross-desktop startup is not very uniform but I think the proper way to do this (cross-desktop) is to do this:
Make sure you have a directory called '.config/autostart'. Then add a file to it called 'xbindkeys.desktop' with content along these lines:
This is what happens in Gnome when you add an entry in System->Preferences->StartupApplications.
System->Preferences->KeyboardShortcuts then [+Add]
gnome-terminal --geometry 80x52 --working-directory $HOME
I like to set up my keyboard shortcuts with a script since I like to use them on whatever computer I'm on. I did this before with gconftool2 and that worked fine, but now a person has to set them in a different location in a different way... which got me thinking that it would be nice to set keyboard shortcuts in a cross-desktop (KDE, Gnome, wmii, whatever) kind of way.
Solution: xbindkeys
sudo apt-get install xbindkeys
Make a file called '.xbindkeysrc' in your home directory with something like this in it:
"gvim"
  control+alt + g
"nautilus"
  control+alt + n
"firefox -new-window http://gmail.com"
  control+alt + e
"nautilus"
  control+alt + h
"firefox"
  control+alt + f
"gnome-terminal --geometry 80x40"
  control+alt + t
"rhythmbox"
  control+alt + m
now you can turn on the shortcuts with the simple command 'xbindkeys', but we'd really like for them to be turned on once when we login. Turns out cross-desktop startup is not very uniform but I think the proper way to do this (cross-desktop) is to do this:
Make sure you have a directory called '.config/autostart'. Then add a file to it called 'xbindkeys.desktop' with content along these lines:
[Desktop Entry]
Type=Application
Name=XBindKeys
Exec=xbindkeys
Icon=system-run
Comment=
Name[en_US]=XBindKeys
Comment[en_US]=
X-GNOME-Autostart-enabled=true
This is what happens in Gnome when you add an entry in System->Preferences->StartupApplications.
Tuesday, April 14, 2009
Installing Storey's edge microarray software on Ubuntu
It takes a few steps to install this (Intrepid Ibex, Ubuntu 8.10), but here's how I got it working (we'll see if there are any bugs):
edge website
edge website
- Install R
- Download and unpack the source file:
- Install impute
- prepare the compiling environment
- Compile the sucker
- Run the software
- Restore the original environment
sudo aptitude install r-base
linux src page
Download the above link and install with something like this:
sudo R CMD INSTALL packages/impute_1.0-5.tar.gz
sudo aptitude install g++-4.2 gfortran-4.2 tetex-base
# (also might need tetex-extras ...)
sudo rm /usr/bin/g++  # just removes the soft link
sudo ln -s /usr/bin/g++4.2 /usr/bin/g++
sudo rm /bin/sh  # just a link to /bin/dash
sudo ln -s /bin/bash /bin/sh
cd src ; make ; make install
The make install command just copies the .so files up a directory
R
Then from within R started at the base of the package:
source("edge.r")
edge()sudo rm /usr/bin/g++
sudo ln -s /usr/bin/g++4.3 /usr/bin/g++
sudo rm /bin/sh
sudo ln -s /bin/dash /bin/sh
Parametric and non-parametric t-testing
If your data are distributed normally, the t-test can help you determine if the means of your two samples are greater than or less than each other (one-tailed) or just plain different from each other (two-tailed). These examples are for paired samples, to make them not paired just delete the "paired=TRUE" statement altogether, default is unpaired.
We'll use the same data throughout:
x <- c(1.83, 0.50, 1.62, 2.48, 1.68, 1.88, 1.55, 3.06, 1.30)
y <- c(0.878, 0.647, 0.598, 2.05, 1.06, 1.29, 1.06, 3.14, 1.29)
When using your own data you just need them in vectors (as shown).
One-tailed
t.test(x,y,paired=TRUE,alternative="greater")
t.test(x,y,paired=TRUE,alternative="less")
Two-tailed
t.test(x,y,paired=TRUE)
What if your data are not normal? The non-parametric Wilcoxon test will do the trick. The Wilcoxon rank-sum test is for independent samples (unpaired). The Wilcoxon signed rank test is for paired samples.
wilcox.test(x, y, paired = TRUE)
We'll use the same data throughout:
x <- c(1.83, 0.50, 1.62, 2.48, 1.68, 1.88, 1.55, 3.06, 1.30)
y <- c(0.878, 0.647, 0.598, 2.05, 1.06, 1.29, 1.06, 3.14, 1.29)
When using your own data you just need them in vectors (as shown).
One-tailed
t.test(x,y,paired=TRUE,alternative="greater")
t.test(x,y,paired=TRUE,alternative="less")
Two-tailed
t.test(x,y,paired=TRUE)
What if your data are not normal? The non-parametric Wilcoxon test will do the trick. The Wilcoxon rank-sum test is for independent samples (unpaired). The Wilcoxon signed rank test is for paired samples.
wilcox.test(x, y, paired = TRUE)
Who is R?
After several years of using R to do various tasks from simple t-tests to much larger data sets I think I finally understand who R is.
R is like the computers of yesteryear, it does what you tell it, and only what you tell it, period. If you want more than the minimal amount of output, you have to ask for it. But it also has a bit of an attitude, for example, instead of outputting the type 3 sums of squares in ANOVA like virtually every other statistical package, it outputs the type 1 sums of squares by default. Why you might ask? The reason is because they want you to first think about what type of sums of squares you want, so by default they give you the one that isn't the most commonly used one. Hence R has a steep learning curve, which after several years I am still trying to surmount.
Enough talk, time for some code in the next post.
R is like the computers of yesteryear, it does what you tell it, and only what you tell it, period. If you want more than the minimal amount of output, you have to ask for it. But it also has a bit of an attitude, for example, instead of outputting the type 3 sums of squares in ANOVA like virtually every other statistical package, it outputs the type 1 sums of squares by default. Why you might ask? The reason is because they want you to first think about what type of sums of squares you want, so by default they give you the one that isn't the most commonly used one. Hence R has a steep learning curve, which after several years I am still trying to surmount.
Enough talk, time for some code in the next post.
Subscribe to:
Posts (Atom)